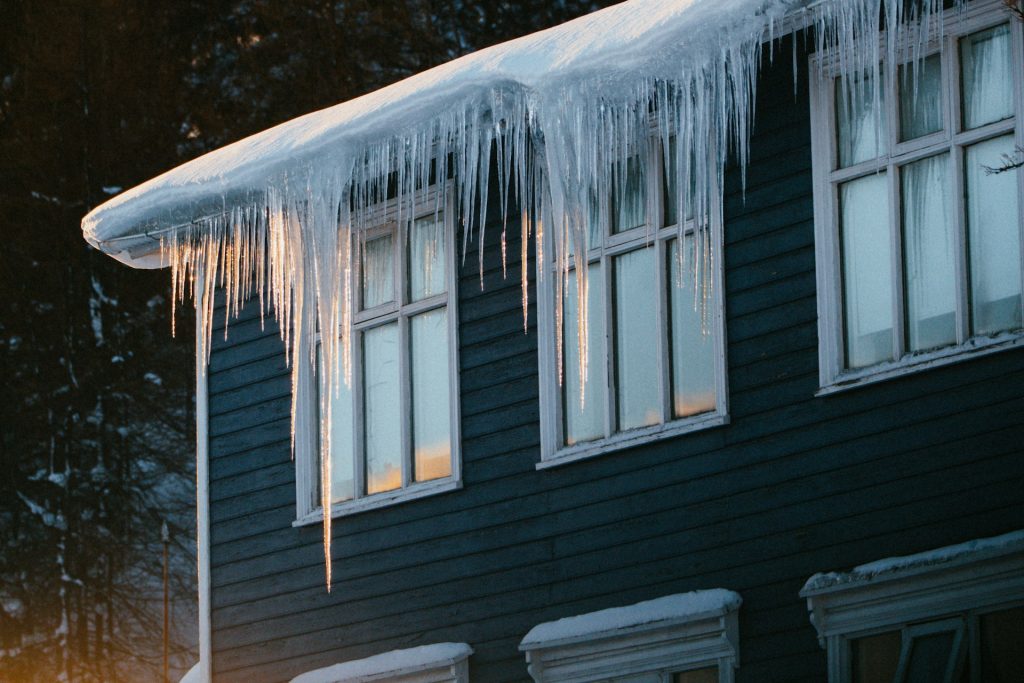
If you’ve lived in Markham through a few winters, you know how it goes. A big snowfall lands on your roof, then a few warmer days hit, and before long you’ve got thick ice building up along the edges. Maybe some large icicles hanging off the eaves, a classic warning sign that an ice dam on your roof may be forming. It looks dramatic, and honestly? It is. That ice buildup isn’t just a winter quirk. It’s a warning sign that something is off with how heat is moving through your home.
The good news: ice dams are a well-understood problem with clear solutions. This guide will walk you through what causes them, what kind of damage they can do, what you can do right now if you have one, and how to make sure they stop coming back.
What Is an Ice Dam?
An ice dam is basically a wall of ice that builds up along the edge of your roof. Think of it like a frozen dam in a river. It stops water from flowing where it needs to go. When snow on your roof starts melting, that water runs downhill, hits the ice wall, and just sits there with nowhere to drain. Over time, that standing water starts creeping under your shingles, and once it gets past them, it can end up soaking your ceilings, walls, and insulation inside the house.
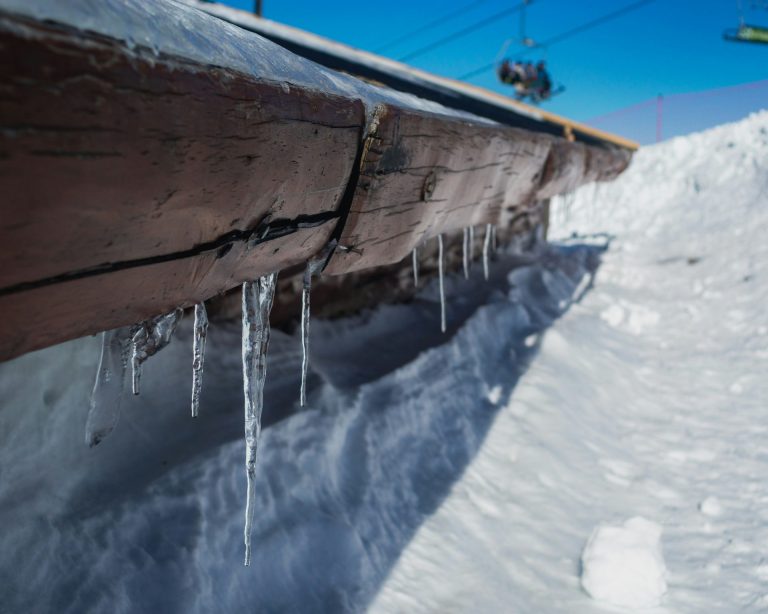
Big icicles hanging from your eaves are often the first visible sign. They’re not just heavy and dangerous to anyone walking below but they can also mean an ice dam is already forming or in full swing.
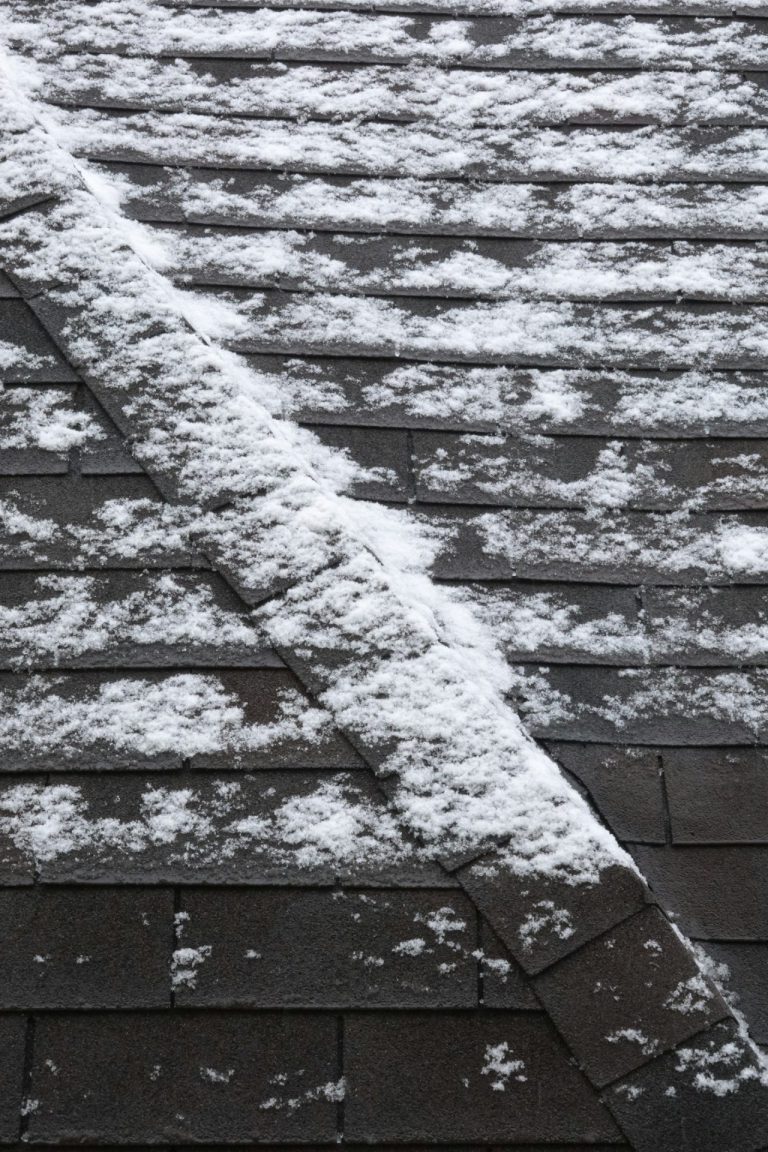
Ice dams are a winter headache that many homeowners in Markham and similar climates know all too well. Preventing ice dams starts with understanding how they form and taking steps to address the root causes.
Proper ventilation in your attic, effective air sealing to stop warm air from leaking upward, and adequate insulation all work together to keep your roof surface at a consistent temperature. This prevents melting snow from refreezing at the roof’s edge.
Another practical tip is to use a roof rake after heavy snowfall to safely remove snow from the lower sections of your roof, reducing the risk of ice buildup. By staying proactive with these measures, you can help prevent ice dams and protect your home from costly winter damage.
How Do Ice Dams Form?
When heavy snowfall blankets your roof and temperatures dip below freezing, the stage is set for ice dams to happen. Here’s how it works a bit more in-depth: as heat escapes from your home, it warms the roof and causes snow to melt. This melting snow then flows down the roof until it reaches the colder roof edge, where it refreezes and forms a barrier of ice. Over time, this ice dam prevents melting snow from draining off the roof, leading to water backup that can seep under shingles and damage your roof, insulation, and even your exterior walls.
Here’s the key thing to understand: ice dams aren’t really caused by the cold. They’re caused by uneven temperature across your roof surface.
Thaw cycles, periods of melting and refreezing, contribute to the formation of ice dams at the roof’s edge. During winter, snow accumulation on your roof increases the risk as more water flows down the slope when snow melts. As this water flows toward the colder eaves, it refreezes and begins to form ice dams. The frozen ridge grows over time as more snow melts above it, and the formation of ice dams is accelerated by repeated thaw cycles. Water pools behind the dam and looks for any crack or gap it can find, often finding one under your shingles.
Where does that warmth come from? Almost always from inside your house. Inadequate insulation and poor attic ventilation can lead to uneven heat distribution, raising the surface temperature of the roof and causing the formation of ice dams. This uneven surface temperature allows snow to melt higher up on the roof, and as ice dams happen, the meltwater refreezes at the colder eaves, continuing the cycle.
Does Poor Attic Ventilation Cause Ice Dams?
Yes, absolutely. Poor attic ventilation is one of the main drivers. When your attic isn’t properly ventilated, warm air gets trapped inside and heats the roof deck unevenly. The ridge and upper sections of your roof warm up, snow melts, and the cycle begins.
A properly ventilated attic relies on roof ventilation, which is a key part of your roofing system. A balanced ventilation system requires intake vents at the eaves and exhaust vents at the peak. This setup uses soffit vents at the eaves to bring in cold outside air and ridge vents at the peak to push warm air out. Ensuring proper attic ventilation helps maintain uniform roof temperatures, which is essential in preventing ice dams from forming. That constant airflow keeps the roof surface at a more uniform temperature which is exactly what you want. If your soffits are blocked by insulation or debris, that airflow stops working.
The Role of Insulation in Ice Dam Formation
Inadequate insulation is just as much of a culprit. When your attic ceiling doesn’t have enough insulation, heat from your living space conducts right through it and warms the roof deck. The more heat that escapes upward, the faster snow melts and the more likely you are to end up with ice dams every winter.
Adding insulation helps keep that heat where it belongs: inside your home, not radiating upward into the attic. In Ontario, building codes set minimum insulation requirements for attics. If your home is older, there’s a good chance it doesn’t meet current standards, and upgrading can make a noticeable difference both in ice dam prevention and in your heating bills. Improving attic insulation is a cost-effective way to prevent ice dams and lower your heating costs compared to more expensive repairs or re-roofing.
Air Leaks: The Biggest Problem You Can't See
Here’s what surprises a lot of homeowners: air leaks often cause more heat loss than inadequate insulation does. Warm, moist air from your living space can sneak into the attic through gaps around pot lights, plumbing penetrations, the attic hatch, and poorly sealed heating ducts. Once that warm air is in the attic, it heats the roof deck directly.
Sealing those gaps with spray foam, caulk, or weatherstripping is often the single most effective thing you can do to prevent ice dams. Sealing air leaks in the attic can significantly reduce heat migration, which is a major contributor to ice dam formation. Air sealing provides extra protection against ice dam issues. It’s also one of the most affordable fixes, especially compared to the cost of water damage repairs.
Identifying an Ice Dam Problem
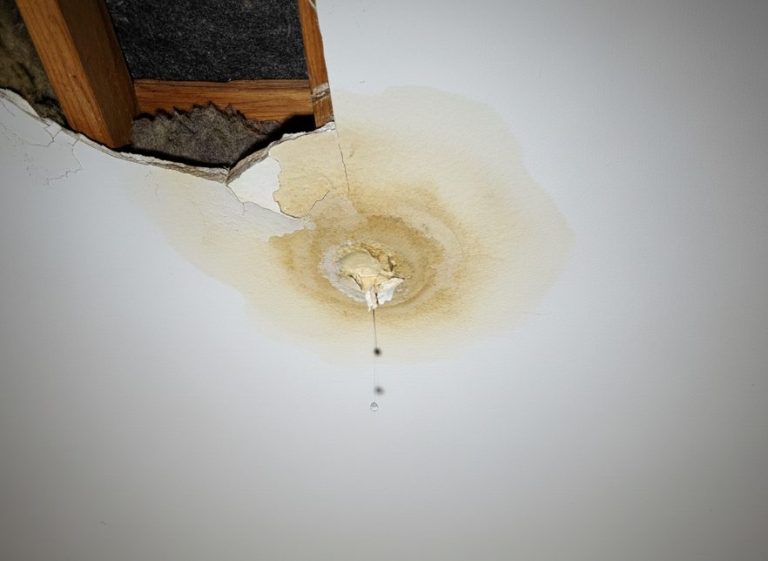
Spotting an ice dam problem early can save you from major headaches down the road. One of the most obvious signs is the appearance of thick icicles hanging from the roof’s edge, especially if they’re accompanied by a ridge of ice or snow buildup along the eaves. Inside your home, keep an eye out for water stains, peeling paint, or damp patches on ceilings and walls, which can signal that water is making its way past your shingles.
It’s also a good idea to inspect your gutters for blockages or signs of damage, as clogged gutters can make ice dam formation worse. If you notice areas where snow has accumulated unevenly on your roof, or if you see ice forming in places it shouldn’t, these are red flags that your attic ventilation or insulation may not be up to par. Air leaks and heat loss from your living space into the attic are common culprits behind ice dam problems, as they create the temperature differences that allow ice to form. By catching these warning signs early and addressing the underlying issues like improving attic ventilation or sealing air leaks. This can prevent small problems from turning into major ice dam damage.
What Damage Can an Ice Dam Cause?
Ice dam issues can lead to a range of water damage and structural problems. Water damage is the main threat, and it can range from a minor stain on your ceiling to serious structural problems if left unaddressed. When water backs up behind a dam and pushes under your shingles, it can soak into your insulation, damage drywall, stain or crack plaster, and even affect the structural framing of your walls and roof, especially if underlying issues like clogged or failing eavestroughs are also present.
Ice dams can also tear gutters right off the house under their own weight. The ice expands, the fasteners give out, and suddenly you’re looking at bent or missing eavestroughs that need replacing. Soffits and siding near the roof edge can also take a beating.
Can Ice Dams Cause Mold?
Yes, and this is the part homeowners often don’t think about until it’s already a bigger problem. When water seeps in through an ice dam and dampens insulation or wood framing, that moisture doesn’t always dry out on its own. In an enclosed attic or wall cavity, mold and mildew can take hold quickly and create air quality issues for everyone in the house.
If you’ve had a leak from an ice dam, drying things out fast matters. Don’t just patch the ceiling and move on. Make sure the source of the moisture is dealt with, and check that the affected area is fully dry before closing it back up.
Is Ice Dam Damage Covered by Home Insurance?
The short answer is: sometimes. Most standard home insurance policies in Ontario will cover sudden and accidental water damage caused by an ice dam. Insurance policies may also cover damage caused by dams on your roof, but coverage varies depending on your specific policy. But if the same problem happens season after season, insurers may classify it as a maintenance issue and decline to cover it.
Coverage also varies significantly between policies. Some basic policies won’t cover ice dam damage at all without added water damage protection. It’s worth reviewing your policy and talking to your provider before you have a problem, not after. And if you’re already dealing with water coming into your home right now, call your insurer right away rather than waiting.
What To Do Right Now: Emergency Ice Dam Removal
If you have an active ice dam and water is getting into your home, the priority is creating drainage channels, not removing all the ice at once.
Step-by-step: How to Melt Channels Through an Ice Dam with Hot Water
Gather your supplies: You’ll need hot water (in a kettle or bucket) and a way to safely reach the lower edge of your roof (from the ground or a stable ladder placed on solid ground).
Start at the lower edge: Begin at the bottom of the ice dam, where the ice meets the roof edge.
Pour hot water carefully: Slowly pour hot water onto the ice, working your way upward to melt a small channel through the dam.
Create drainage paths: The goal is to make narrow channels that allow trapped water to drain off the roof, reducing the risk of further water backup.
Repeat as needed: Continue melting channels until water can flow freely off the roof.
Stay safe: Always work from the ground or a stable ladder and never climb onto a snow- or ice-covered roof.
A few things to avoid: never use an axe, hammer, or pick to break ice on a roof. You’ll likely damage shingles or the roofing membrane in the process. And don’t use rock salt or sodium chloride as a de-icer. It can damage asphalt shingles and kill the vegetation below when it runs off.
How to Use a Roof Rake

A roof rake is a long-handled tool that lets you pull snow off the lower sections of your roof from the ground. Removing snow and ice from your roof is key to preventing ice dams and maintaining roof integrity. After a heavy snowfall, removing that snow before it has a chance to melt and refreeze is one of the simplest and safest things you can do to prevent ice dams from forming.
Key Points for Safe and Effective Roof Rake Use:
Use from the ground: Always operate the roof rake while standing on the ground and never climb onto the roof.
Start at the edge: Begin raking at the roof’s edge and work your way upward, removing snow in small sections.
Be gentle: Use short, careful strokes to avoid scratching or dislodging the granules on asphalt shingles.
Avoid aggressive raking: Dragging the rake aggressively can damage your shingles and shorten your roof’s lifespan.
Clear lower sections: Focus on removing snow from the lower portions of the roof, where ice dams are most likely to form.
The Calcium Chloride Trick for Ice Dams
If you need a temporary fix while you arrange longer-term repairs, filling old pantyhose or tube socks with calcium chloride and laying them vertically across the ice dam can help melt channels through it. Unlike rock salt, calcium chloride is less damaging to roofing materials, though you still want to rinse the area once things thaw out.
This is a short-term measure, not a solution. It buys time, but it doesn’t address why the ice dam formed in the first place.
Heat Cables: Are They Worth It?
Heat cables, sometimes called heat tape, are installed in a zigzag pattern along the roof edge to keep meltwater moving and prevent refreezing. They can be effective at managing ice along the eaves during Ontario winters, especially when they’re connected to an automated system that activates in icing conditions.
That said, heat cables don’t fix the underlying problem. They address the symptom (ice buildup at the roof edge) but they don’t stop the heat from escaping your attic that causes the ice to form in the first place. Think of them as a supplement to proper insulation and ventilation, not a replacement.
Long-Term Prevention: How to Stop Ice Dams for Good
Preventing ice dams permanently comes down to controlling how heat moves through your home. There are three things that matter most:
Improve your attic insulation. Adding insulation to the attic floor keeps more heat in your living space and off the roof deck. In Ontario, older homes often need significant upgrades to meet current code levels, and the improvement in comfort and energy savings is usually noticeable right away.
Seal all your air leaks. Before adding more insulation, seal gaps around pot lights, plumbing stacks, the attic access hatch, heating ducts, and any other penetrations. Warm air slipping through those gaps is often the biggest driver of ice dam formation.
Make sure your attic ventilation is working properly. Soffit vents need to be clear and unobstructed, and your ridge or roof vents need to allow warm air to exhaust freely. Styrofoam baffles can be installed between rafters to keep airflow channels open even when insulation is added.
For extra protection against water infiltration caused by ice dams, consider installing an ice shield or similar product at the roof’s eaves. This added layer helps prevent water from seeping into your home during winter.
If you’re not sure where your home is losing heat, a qualified energy auditor can perform a blower door test and use an infrared camera to show you exactly where the problem areas are. It takes the guesswork out of the process completely.
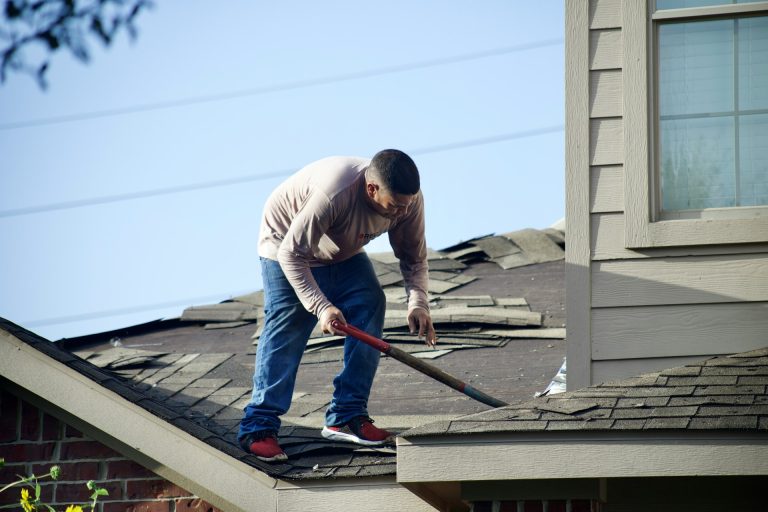
When To Call a Roofing Professional
If ice dams are showing up on your roof every winter, or if you’ve noticed water stains on your ceilings, damaged soffits, sagging eavestroughs, or any signs of moisture in the attic then it’s time to get a professional involved. A roofing contractor who knows Ontario’s climate can assess your roof system, identify where heat loss is occurring, and recommend targeted professional roofing services in Canada that actually solve the problem long-term.
Talk to Edmunds Home Improvements for All Roofing Needs
At Edmunds Home Improvements, we’ve been helping Markham homeowners protect their roofs and homes for decades with comprehensive siding and roofing services in Markham. Whether you’re dealing with an active ice dam, recurring winter damage, or you just want to make sure your roof is set up properly before next winter hits, our team is here to help.
Give us a call or reach out through our contact page. We’ll take a look at what’s going on and give you honest, straightforward advice on the best path forward, backed by decades of exterior renovation experience and real-world roofing expertise.
If you’re considering broader upgrades after ice dam damage, you can explore our project gallery of home improvement examples, learn about home renovation financing options, or look into our specialized services such as comprehensive residential roofing solutions, new roof installation services, and energy-efficient window and door installation. Many homeowners also find it reassuring to read testimonials from other Edmunds customers before starting a project.