
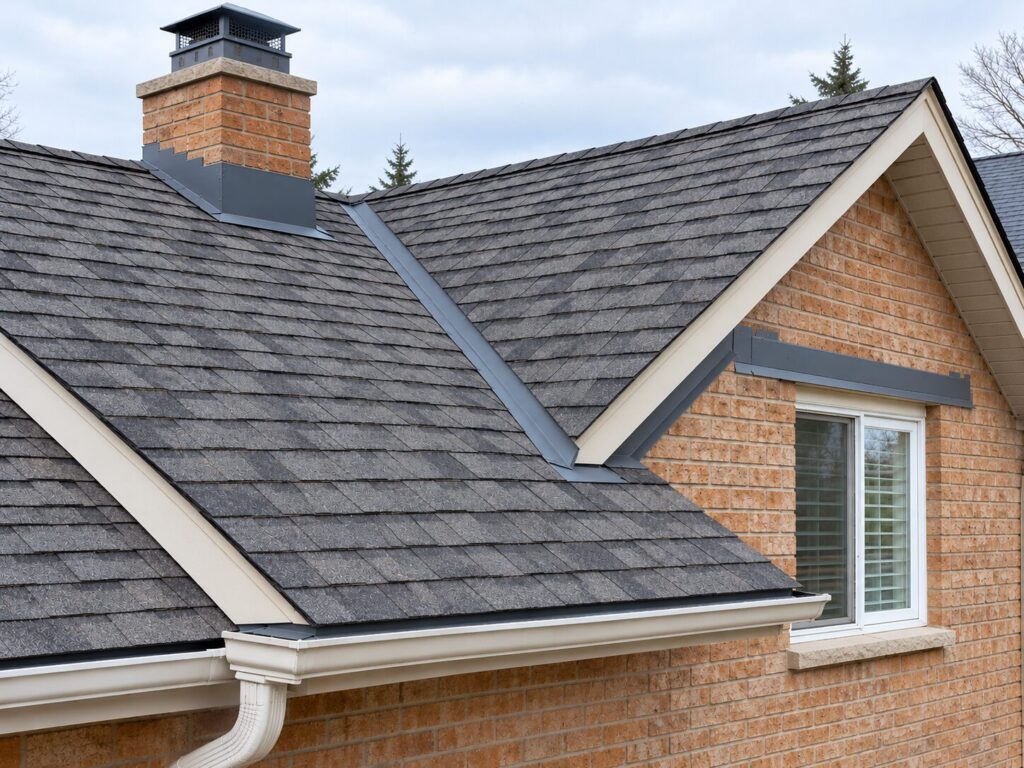
Roof flashing is a thin material, usually galvanized steel, aluminum or copper, installed wherever your roof has a joint, a wall, a valley or a pipe coming through it. Its job is to send water past those spots instead of into them.
The question “what is roof flashing” usually comes up when a roofer mentions it on a quote, or when a brown stain shows up on the ceiling near the chimney. I’ve been working on roofs across Markham and York Region for more than 30 years, and failed flashing is one of the most common leak sources I trace.
This guide covers what flashing does, the types of roof flashing on a typical Markham house, what the Ontario Building Code requires, how to tell when flashing is failing and what repairs cost in the GTA.
What Does Flashing Do for a Roof?
Flashing keeps water out of the joints, which are the vulnerable areas where shingles alone can’t shed water. Shingles handle open stretches of roof well. They can’t seal the gap where two roof planes meet, or where the roof plane meets a vertical surface like a wall or chimney.
Those gaps are where water infiltration starts. Roof flashing bridges each one with lapped metal and a watertight seal, so rain and snowmelt keep moving downhill toward the eavestroughs.
On a typical Markham house you’ll find flashing around the chimney, along sidewalls and dormers, in the valleys, around plumbing vents and skylights, and along the eaves and rakes. Each is a change in direction or one of the roof penetrations, and each is a place water damage can start. When the flashing is right, the rest of the roofing system can last its full life.
Does Flashing Go Over or Under the Shingles?
Both, and that layering is the whole trick. Flashing tucks under the shingle course above it and laps over the course below, so water always lands on top of the next layer down.
Step flashing is woven in with each course of asphalt shingle, which is why replacing it means lifting shingles. Flashing laid on top of finished shingles and smeared with tar is a shortcut, and water finds its way behind it sooner or later.
Why Ontario Winters Are Hard on Flashing
York Region roofs go through many freeze-thaw cycles every winter. Metal flashing grows and shrinks with the temperature while the brick, wood and shingles around it move at different rates, and that expansion and contraction loosens nails, cracks sealant and lifts edges. Meltwater gets into the opening, freezes and pries it wider.
Ice dams push from the other direction, backing water up under the shingles at the eaves. That’s why the Ontario Building Code requires an eave protection membrane on most shingle roofs, running at least 900 mm up from the roof edge to 300 mm past the inside of the exterior wall.
Flashing works with that membrane; it doesn’t replace it. Our guide to ice dams explains the causes and fixes.
Types of Roof Flashing on Markham Homes
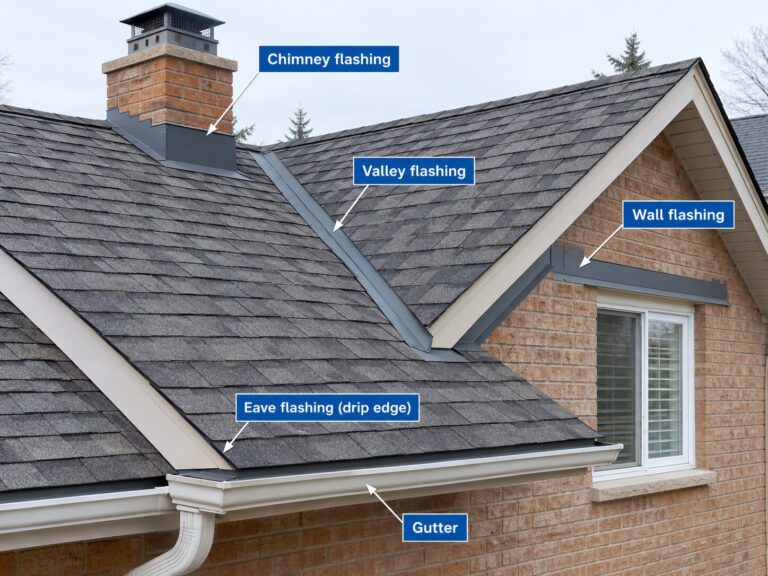
A typical Markham house has several types of roof flashing, each shaped for one kind of joint. Nearly all of it is metal flashing; the exception is the rubber collar around plumbing vents.
Step Flashing
Step flashing is a series of small rectangular pieces of thin metal, bent at 90 degrees, that run up the side of a wall or chimney one shingle course at a time. Each piece overlaps the one below it like a staircase.
The Ontario Building Code calls for step flashing at a siding wall to extend at least 75 mm up the wall, behind the sheathing paper, and 75 mm onto the roof. IKO, the shingle manufacturer, sets a minimum piece size of 10 inches (254 mm) long and 2 inches wider than the shingle exposure.
Step flashing should be nailed to the roof deck only, never to the vertical wall, so the roof and the wall can move separately. On older homes, step flashing is sometimes found nailed into the siding, or skipped and replaced with a bead of caulk.
Counter Flashing and Base Flashing
At a brick chimney or masonry wall, flashing comes in two parts. Base flashing sits on the roof, and counter flashing is set into the mortar joints above it and folds down over the top edge of the base flashing.
This two-part flashing lets the pieces slide past each other as the chimney and the roof framing expand and contract. Counter flashing is also called cap flashing, and roofers usually call the whole assembly chimney flashing.
The Ontario Building Code is specific here. Counter flashing has to be set at least 25 mm into the masonry, extend at least 150 mm down the brick and lap the flashing below it by at least 100 mm, with a 75 mm head lap where it steps down the slope.
If the uphill side of a chimney is more than 750 mm wide, the code generally requires a saddle (or cricket) to split the water around it, with its own flashing and counter flashing.
Continuous (Apron) Flashing
Continuous flashing, also called apron flashing, is one long piece that runs across the bottom of a wall where it meets a sloped roof, such as the front face of a dormer. Roofers sometimes call it headwall flashing.
A single long strip moves more with temperature than small pieces do, so long runs need built-in expansion joints to keep the metal from buckling.
Valley Flashing
Valley flashing lines the V where two roof planes meet, which carries more water than almost any other part of the roof. In an open valley you can see the sheet metal down the centre; in a closed valley, shingles cover the valley lining, which may be metal or a membrane.
The Ontario Building Code requires open valleys to be lined with sheet metal at least 600 mm wide, or two layers of roll roofing. In a Markham spring, melting snow from two slopes funnels into roof valleys, so a weak one shows itself early.
Drip Edge Flashing
Drip edge is the L-shaped metal strip along the eaves and rakes that throws water off the roof edge and into the eavestroughs. Without it, water can curl back under the shingles, and that water intrusion soaks the fascia and roof decking. Drip edge flashing costs little compared with the rot it prevents.
Vent Pipe Flashing and Pipe Boots
Flashing on a roof vent is a flat base with a rubber collar that hugs the plumbing vent pipe, and roofers usually call it a pipe boot. The base slides under the shingles above and over the shingles below, and the collar seals around the pipe itself.
Standard rubber boots are usually the least durable flashing on the roof. Sun and winter cold dry the rubber until it cracks, often years before the shingles around it wear out.
A split pipe boot is one of the most common leaks I find on roofs that otherwise look healthy, so have the vent pipe flashing checked whenever someone is on your roof.
Skylight and Kickout Flashing
Skylights usually come with a flashing kit from the manufacturer, built to fit that unit. Installing the matching kit, rather than improvised metal and sealant, is what keeps a skylight dry.
Kickout flashing is a small diverter at the bottom of a roof to wall joint, where the step flashing ends. It turns water into the gutter. Without it, water runs behind the siding and can cause water damage, wood rot and mould growth inside the wall for years before anyone notices.
Other Names You'll See on a Roofing Quote
Roof flashing goes by several names, so a quote can be hard to read. Here is what the common terms mean:
Term on the quote | What it is |
|---|---|
Cap flashing | Counter flashing set into a chimney or brick wall |
Apron or headwall flashing | Continuous flashing along the bottom of a wall |
Pipe boot | Vent flashing with a rubber collar |
Kickout or diverter | Small piece that turns water into the gutter at a wall |
Drip edge | Metal strip along the eaves and rakes |
Chimney re-flash | New base, step and counter flashing around a chimney |
Valley metal | Open valley flashing |
If a roofing contractor lists any of these, ask whether it means new metal or re-sealed old metal.
Roof Flashing Materials: Which Is Best for Ontario?
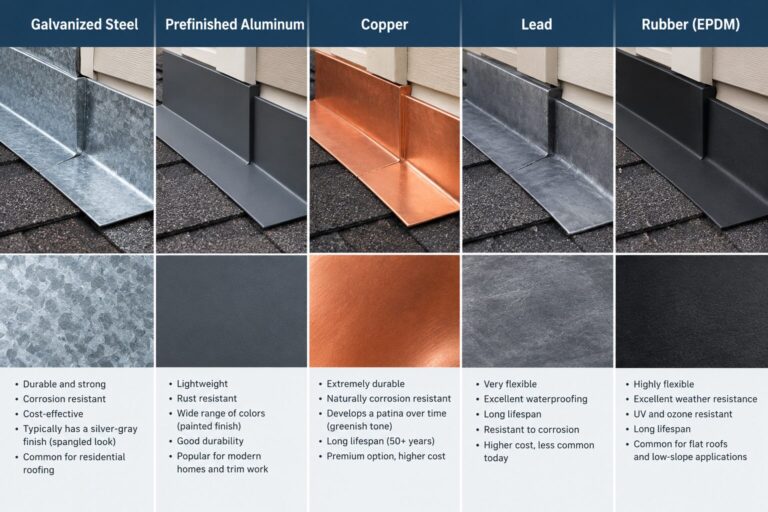
On Markham homes, the usual roof flashing materials are galvanized steel and prefinished aluminum. Both handle freeze-thaw cycles well when installed properly, and copper is the premium option for chimneys and heritage homes.
Material | Typical lifespan | Where it fits | Watch out for |
|---|---|---|---|
Galvanized steel | Typically 20–30 years | Chimneys, valleys, general flashing | Rusts once the zinc coating is scratched or worn |
Prefinished aluminum | Varies with coating and exposure | Edge trim, step flashing on siding walls | Must be coated where it touches mortar or concrete |
Copper | Decades longer than steel | Heritage homes, high-end chimneys | Highest cost; runoff corrodes steel and aluminum below it |
Lead | Long-lived | Historic masonry restorations | Largely replaced by steel on new work |
Rubber (EPDM) | Shortest of all | Pipe boot collars only | Usually the first flashing part to fail |
Two cautions apply no matter which metal you choose. Plain aluminum flashing breaks down where it touches mortar or concrete, so it must be coated at a chimney or brick wall. And runoff from copper roof flashing causes galvanic corrosion on galvanized steel or aluminum below it, so copper shouldn’t sit uphill of other metals.
A metal roof uses its own trim and flashing, usually made to match the panels. For how flashing life fits into the bigger picture, see how long a roof lasts in Markham.
Is Roof Flashing Required in Ontario?
Yes. The Ontario Building Code requires flashing wherever a shingle roof meets a masonry wall, a chimney or a wall clad in siding, and it sets rules for valleys and eaves too.
In plain terms: chimneys and brick walls need two-part flashing set into the mortar (the measurements are in the section above), siding walls need step flashing behind the sheathing paper, open valleys need a wide strip of sheet metal, and the eaves need a membrane under the shingles.
These building codes set minimums, not best practice. A roofing professional who knows them will price new metal into a quote rather than promising to “seal” the old flashing.
Before you sign, ask whether the chimney, wall and valley flashing are being replaced or reused. If the answer is “reused,” ask why.
What Are the Common Problems with Roof Flashing?
The most common roof flashing problems are caulk used in place of proper metal, rusted or lifted edges, cracked pipe boots and missing counter or kickout flashing. Many of them come down to improper installation rather than the metal wearing out.
Roofing cement and caulk belong in a flashing job, but only to back up the waterproof seal that lapped metal creates. When caulk is doing the main work, it dries, shrinks and cracks after a few winters, and the leak comes back.
Rust is the other common failure. Once the zinc coating on galvanized steel is scratched or worn through, rust spreads and eventually leaves pinholes.
Left alone, any of these leads to roof leaks, water damage to ceilings and insulation, rotted decking and, over time, weaker structural integrity in the roof framing. If water is already coming in, start with our guide on how to repair a leaky roof.
Signs Your Roof Flashing Needs Attention
You can spot most flashing problems from the ground with binoculars, or from inside the attic with a flashlight.
Outside, look for:
Rust streaks below a chimney or wall
Flashing that is bent, lifted or missing
Cracked or peeling caulk around a chimney or skylight
A split or flattened rubber collar on a plumbing vent
Stains or peeling paint on siding below a roof-to-wall joint
Inside, look for:
Water stains on ceilings near a chimney, skylight or exterior wall
Dark or damp patches on the roof decking in the attic
Mould or a musty smell in the attic
Drips that only appear during wind-driven rain or the spring melt
How Long Does Roof Flashing Last?

Galvanized steel roof flashing typically lasts 20 to 30 years, but pipe boots and sealant usually need attention well before that. The materials table above covers the other metals.
So the practical answer to how often flashing should be replaced is: with every roof replacement, and in between whenever one part fails. Most reputable roofers replace the step flashing and drip edge during a re-roof instead of reusing the old metal.
When I quote a re-roof in Markham, I price new step flashing every time, because old metal rarely survives being pried up. Reusing it saves a little money and puts the whole roofing system at risk.
Between roofs, professional roofers can usually repair flashing on its own if the shingles around it are sound. Have it checked once a year and after major storms; in Ontario, early spring and late fall are the most useful times. Our roof inspection checklist covers what to look at, and our guide on when to repair or replace your roof helps if the problems go beyond flashing.
How Much Does Roof Flashing Repair Cost in Markham?
One Toronto roofing contractor’s published 2026 price list puts most single flashing repairs at a few hundred dollars and a full chimney re-flash at $1,200 to $2,500, depending on access and shingle work:
Repair | Published price, Toronto contractor (CAD) |
|---|---|
Pipe boot replacement | $200–$400 |
Step flashing, one side of a chimney | $400–$900 |
Full chimney re-flash (all sides) | $1,200–$2,500 |
Open metal valley flashing, per valley | $350–$700 |
Skylight flashing kit installation | $500–$1,200 |
Sidewall flashing, per section | $300–$650 |
Drip edge, per linear metre | $8–$18 |
Steep or tall roofs, crumbling chimney mortar that needs repointing and rotten roof decking found under the shingles all push the price up. Be careful with the cheapest quotes: a chimney “re-seal” is not the same job as new chimney flashing, even if both stop the drip for now.
Roof Flashing Repair in Markham from Edmunds Home Improvements
If your roof flashing needs inspection, repair or replacement in Markham, Edmunds Home Improvements has been serving York Region homeowners since 1947. Steve Gibson brings more than 30 years of roofing experience to every job, and our crews install new, properly lapped metal to the Ontario Building Code.
We offer free estimates and stand behind our work with a warranty. Call us at 905-472-0276 or book a flashing inspection on our contact page.
For active leaks, our roof repair services in Markham cover everything from a single pipe boot to a full chimney re-flash. If the roof itself is near the end of its life, we also handle new roof installation across the GTA.

Steve Gibson
President & CEO, Edmunds Home Improvements
Steve Gibson has over 35 years of hands-on experience in home renovation across
Markham and the Greater Toronto Area. As President and CEO of Edmunds Home
Improvements — a company serving the community since 1947 — Steve specializes in
roofing installation and repair, siding, window replacement and installation, and
door installation. A longtime local resident, he took ownership of Edmunds in 1989
and has built the company into one of the GTA’s most trusted exterior renovation
contractors. Edmunds is fully insured (WSIB and $5 million public liability) and
is a BBB Accredited Business and ENERGY STAR partner.
- Roofing installation and repair
- Siding installation
- Window replacement and installation
- Door installation
- Eavestrough and soffit installation
- Exterior home renovation (Markham, ON and Greater Toronto Area)
3400 14th Ave, Unit #28,
Markham,
ON
L3R 0H7