If you own a home in Markham, your roof takes a serious beating every single year. Freeze-thaw cycles crack and shift shingles in late fall and early spring. Ice dams form at the eaves in January and push water under roofing materials. Heavy rain in spring and summer finds every weak spot.
By the time most homeowners notice a problem, the damage is already expensive. A simple roof inspection checklist can help you catch small issues before they turn into costly repairs. Neglecting roof inspections can lead to premature roof replacement, which can cost homeowners between $5,860 and $13,150, highlighting just how much money is at stake.
This checklist covers both exterior and interior roof inspection steps, helping Markham homeowners identify issues early and avoid costly repairs.
It’s for Markham homeowners who want to do a basic visual check on their own and know when to call a roofing contractor. Think of it as a starting point, not a replacement for a professional roof inspection. Some things only a trained eye will catch.
Do you really need to inspect your roof if nothing looks wrong? Yes, and here’s why: a full roof replacement in Canada can run well into the tens of thousands of dollars. Regular roof inspections help you identify potential problems early, saving homeowners money in the long run. Catching a small problem in year three is a lot cheaper than ignoring it until year nine.
A lot of roof damage is not visible from ground level. You need to get up close, safely, or have a professional do it. That means checking both the exterior of the roof and the inside of your attic, paying close attention to attic ventilation and how it affects roof health. This guide covers both.
Scope: This checklist covers both exterior and interior roof inspection steps, including examination of roofing materials, flashing, gutters, and attic spaces. It is designed to help Markham homeowners identify issues early and avoid costly repairs. It’s no replacement for a professional assessment though, and is solely meant as an aide to decide if you should seek such assistance.
Quick Roof Inspection Checklist Summary
Here’s a quick summary checklist to help you get started. Checking your roof properly means looking at both the outside surface and the inside of your home, you need both to get a true picture of what’s going on up there.
Exterior Inspection:
Examine shingles for cracks, missing pieces, curling, or blistering
Inspect flashing and seals around chimneys, vents, and skylights for rust, gaps, or lifting
Check gutters and eaves for clogs, damage, and proper drainage
Look for moss, algae, or staining on the roof surface
Scan for sagging areas or anything out of place along the roofline
Interior Inspection:
Check attic for moisture, mold, and dark stains
Inspect insulation for dampness or clumping
Ensure attic ventilation is clear and functioning
Look for water stains on ceilings and walls
What Are the Most Important Items to Check When Inspecting Your Roof?
The most important things to check are the key roofing components of your roof system, including shingles, flashing, gutters, and attic.
These components account for the majority of roof problems in Ontario homes, and a thorough roof inspection checklist should cover all these roofing components. Each has its own warning signs, and knowing what to look for makes a big difference.
Exterior Roof Inspection Checklist
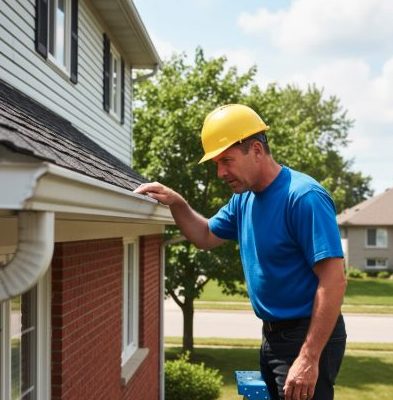
A complete roof inspection covers what you can see from outside and what’s hiding in your attic, giving you a full read on your roof’s health before small problems become big ones. Start by walking the perimeter of your home from the ground and looking up. As you do this, carefully examine the roof for signs of wear and damage. You want to spot any obvious issues before climbing up or calling someone in. Look for missing shingles, sagging areas along the roofline, or anything that looks out of place. This is your first pass, a quick scan that costs nothing.
A roof inspection checklist is a detailed guide that helps homeowners examine roofing materials for signs of damage such as cracks, missing pieces, curling, or blistering.
Check the Shingles
Healthy shingles should lie flat, have a rough texture from the granule coating, and show no signs of cracking or blistering.
Look for:
Curling shingles or shingle edges that are curling up or buckling (indicates aging)
Cracked or blistered shingles
Smooth bald patches where granules have worn away (often shows up as gritty buildup in gutters)
Missing, broken, or blown-off shingles (especially common with 3-tab shingles)
Loose or lifted shingles after storms with high winds
If you see multiple shingles in rough shape, that’s a sign the whole section may be nearing the end of its life.
During a roof inspection, also check for signs of moss or algae, and any pooling water on flat roofs that could signal ice dam risks during Markham winters.
Inspect the Flashing and Seals
Flashing is the metal trim that seals joints around chimneys, vents, skylights, and roof edges.
Examine for:
Rust
Gaps
Sections that have lifted away from the surface
If flashing around chimneys or other roof penetrations is not properly sealed, even a modest rain can send water inside your walls.
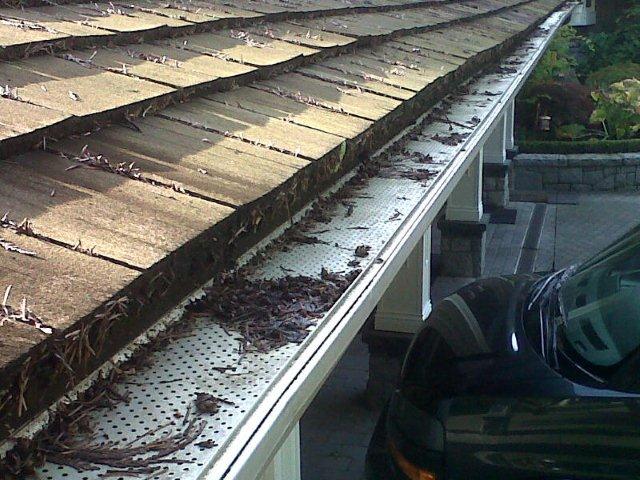
Look at the Gutters and Eaves
Clogged or damaged gutters cause water to back up and push under shingles at the eaves.
Check that gutters are:
Firmly attached
Draining freely
Not pulling away from the fascia
Properly sloped toward downspouts
Ensure water in downspouts flows freely and extends at least 2 meters (6+ feet) away from the foundation.
Look for rot or soft spots along the fascia and soffit boards.
After heavy snow, check the eaves for signs of ice buildup (ice dams), as these can accelerate wear and sometimes force an earlier roof replacement in Markham.
Scan for Moss, Algae, and Staining
Moss and algae hold moisture against roofing materials, shortening their lifespan.
Look for:
Black streaking (algae)
Green patches (moss)
Both indicate moisture buildup and can accelerate shingle breakdown.
Clean and treat the surface if you spot either one.
Once you have completed your exterior inspection, it’s important to check the interior for hidden signs of damage, especially if earlier checks suggest you may soon need professional roofing repair in Markham.
Interior Roof Inspection Checklist
To really know the state of your roof, you need to inspect it from two angles: the exterior surface and the interior spaces below it. One without the other leaves gaps. Once the exterior check is done, head inside to the attic.
Carefully examine the attic and interior spaces for signs of roof damage, as this is where issues often first become visible, sometimes before any signs show up on your ceilings or walls below. Bring a flashlight and take your time.
Check the Attic for Moisture and Mold
Mold growth in the attic is a serious warning sign, usually indicating moisture intrusion.
Use a flashlight to check for:
Dark stains or active leaks, especially around chimneys and pipes
Dark staining, soft spots, or visible mold on the underside of the roof deck
Damp or clumping insulation (indicates a slow leak)
Ensure attic has adequate insulation and ventilation to prevent moisture buildup, since proper design and maintenance here significantly extend the overall lifespan of a Markham roof.
Make sure soffit vents and ridge vents are clear and open.
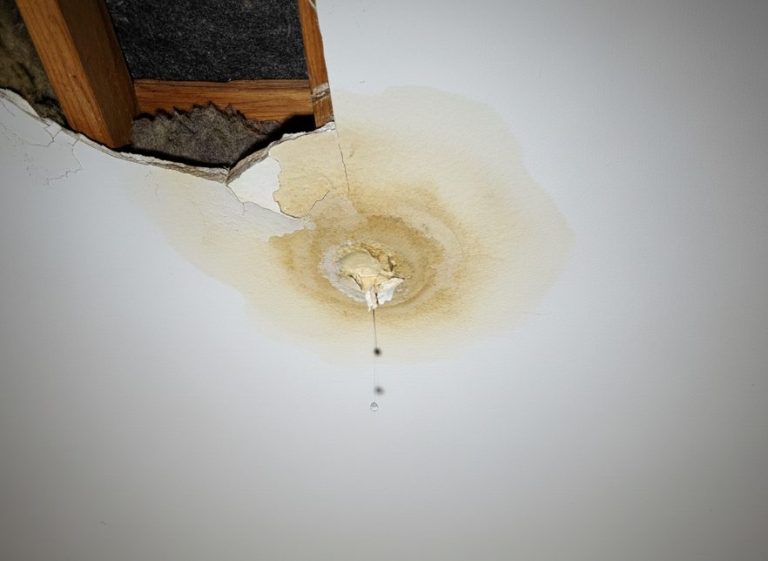
Look for Water Stains on Ceilings and Walls
Water stains often appear as yellow or brown rings on ceilings, or dark streaks running down walls near the top corners of rooms.
Trace stains back carefully, as water can travel along rafters and pipes before dripping down.
A stain in the middle of a ceiling might be coming from a roof penetration that is several feet away.
After completing your interior inspection, you’ll have a comprehensive understanding of your roof’s condition and can decide if professional help is needed.
What Are the 4 Types of Roof Inspection?
There are four main types: a visual inspection from the ground, a hands-on physical inspection up on the roof, an interior or attic inspection, and a professional inspection by a certified roofing contractor. Each inspection involves examining various roof components, such as flashing, gutters, chimneys, and vents, for signs of damage or wear. Most homeowners can handle the first two as part of regular maintenance.
The interior check requires safe attic access and a willingness to look carefully at these components from inside. The professional inspection is the most thorough and should be done at least every one to two years, especially in a climate like Markham where the weather is hard on roofing materials and makes expert roof installation and maintenance services especially valuable.
Transitioning from understanding the types of inspections, let’s look at what your roof needs to do to keep your home protected.
What Are the 5 Functional Requirements of a Roof?
A roof has to do five things well:
Shed water
Resist wind and impact from hail
Provide insulation against heat and cold
Allow proper ventilation to prevent moisture buildup
Support its own weight along with snow loads and debris
A solid foundation is essential for the roof’s overall integrity and durability, so it’s important to inspect the roof deck (the foundation that supports everything on top of the roof) for any signs of sagging, rot, or water damage, and address these issues immediately.
When any one of these breaks down, you feel it pretty quickly. A roof that sheds water but has no proper ventilation will grow mold in the attic within a season or two. A roof that looks fine from the ground but has compromised insulation will show up on your heating bill every winter. These issues become even more pressing given the shorter roof lifespan in Markham’s lake-influenced climate. Regular inspections help you catch problems in each of these areas before they compound.
Now that you know what your roof must accomplish, let’s discuss when it’s time to call in a professional.
When Should You Call a Roofing Contractor?
If your inspection turns up significant granule loss, multiple missing or damaged shingles, active leaks, mold growth in the attic, or flashing that has clearly separated from chimneys or roof penetrations, stop the DIY check and call a roofing contractor. After major storms, also watch for subtle signs of hail damage roof repair needs in Markham. These issues need professional attention before they lead to costly repairs or structural water damage that is much harder to fix.
A good rule of thumb: if you are unsure, hire a professional. An inspection by a certified roofer costs a fraction of what a full repair or replacement would. Most problems that are caught early can be fixed with targeted repairs. The same problems left for a year or two often mean replacing entire sections of the roof, or even coordinating multiple exterior home improvement services like roofing, siding, and gutters.
After understanding when to call a professional, let’s look at how often you should be inspecting your roof in Markham.
How Often Should You Conduct Roof Inspections in Markham?
For Markham homeowners, once a year is the baseline. Ideally, schedule a roof inspection in the fall before winter sets in. Then do a quick visual check in spring once the snow melts to identify areas of concern that winter may have created. If you have had a major storm with heavy rain or hail, do not wait for the annual check, inspect as soon as it is safe to do so, and be especially proactive if you share a roofline and may face a shared roof replacement in Markham.
The freeze-thaw cycle in Markham is particularly tough on roofing. Temperatures swing above and below zero repeatedly through late fall and early spring, and every cycle creates small opportunities for water to get into cracks, freeze, and widen them. Homes here genuinely need more frequent attention than homes in milder Canadian climates.
With inspection frequency in mind, let’s review some common mistakes to avoid when cleaning your roof.
What Are Common Roof Cleaning Mistakes?
The most common mistake is using a pressure washer, which blasts off the protective granules on shingles and can actually lift them away from the surface. Other common errors include scrubbing too aggressively, ignoring the gutters while cleaning the surface, and failing to treat the roof afterward to prevent moss and algae from coming right back.
Cleaning your roof is worth doing, but it needs to be done gently and with the right products, ideally as part of a broader plan for professional roofing repair and maintenance. When in doubt, get a professional roofer to handle it.
Now that you know what to avoid, here’s how to keep track of your inspections year after year.
How to Keep Track: Build Your Own Roof Inspection Checklist

Keeping a simple written checklist from year to year is more useful than it sounds. Tracking the roof’s condition and the condition of its components over time helps you spot patterns like a spot that always shows moisture buildup after heavy rain, or flashing near a chimney that gets lifted every winter. A short annual notes sheet gives you a baseline so you know what is new and what has been there a while, and it also makes conversations with a full-service team like Edmunds Home Improvements for siding and roofing in Markham much easier.
Organize your checklist by zone:
Exterior Surface:
Shingles: condition, granule loss, missing pieces
Moss or algae presence
Sagging areas
Roof Penetrations:
Flashing around chimneys, vents, and skylights
Check seals and look for rust or gaps
Structural:
Roofline for sagging
Cracks in fascia
Soffit damage
Gutter attachment
Interior:
Attic for mold, dark staining, damp insulation
Ceilings and walls for water stains
These four zones cover the essentials of any thorough roof inspection. You do not need a fancy form though; a notes app on your phone or a sheet of paper works fine. If you’re curious about who’s behind this advice, you can also learn more about Edmunds Home Improvements’ history and approach and see testimonials from Markham homeowners we’ve worked with.
Do Not Wait for a Leak to Think About Your Roof
Regular inspections cost far less than reactive repairs. By the time you notice a leak at the ceiling, roof leaks may have already developed and caused significant damage before becoming visible, as water can move through your roof structure for quite a while. Roof maintenance is one of the highest-value things you can do as a homeowner, and it takes less time than most people expect.
The local weather here in Markham is harder on roofs than in many other parts of Canada. Hail in summer, ice dams in winter, heavy spring rain, and freeze-thaw cycles through the shoulder seasons all add up. Your property deserves a look at least once a year and ideally twice.
Talk to the Team at Edmunds Home Improvements

If you found something concerning on your inspection, or you just want a second set of professional eyes on your roof, reach out to us at Edmunds Home Improvements. We have been serving Markham homeowners for years, and we handle everything from quick inspections to full repairs and renovations. No hard sell, no pressure, just honest advice from roofers who know this area and its weather. Give us a call. We’re happy to help.